With a cost of living crisis that just won’t go away, finding gifts that don’t make our bank balances scream in horror is… well, it can be difficult. This is why I’ve been trying to make more gifts myself lately; Nothing says “I love you” like an ill-advised project that you’ve put your blood, sweat, and tears into, especially if you’re lucky enough to have access to equipment like 3D printers. Because I’m testing this for work, and because my in-laws love the best board games as much as I do, I came up with a completely silly idea. Do you see where this is going?
My family worships Catan, and it just so happens that there are tons of free files that let you create a fully 3D version of the board (this community is a gem, I swear). “Perfect!” I thought. “I print the tiles, paint them and off we go. How hard can it be?’ Oh, the sweet summer child that I was.
DIY printing

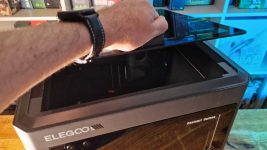
Would you like to try this yourself? I used the Elegoo Centauri Carbon (available of Amazonia), which is a fantastic printer for both beginners and more experienced hobbyists, although the Anycubic Kobra 3 V2 Combo (which you can find here at Amazon) is another great option for those who want to try multi-color printing.
After finding the most current version of the community created files at Thingiverse (which collects free user-submitted designs), I had to make an important decision. No, I don’t question my sanity; should I rather use resin or filament? If you’re not familiar with 3D printing, there are two types of printers and materials you can use. Resin machines use a glowing liquid to form incredibly detailed models, and these are often used for miniatures in wargaming or the best tabletop RPGs. Meanwhile, filament printers rely on those classic plastic rolls that are melted into just about any shape you want (perfect for sturdier creations like terrain or cosplay, in other words).
Since resin looks great but can be brittle, I chose filament. These pieces would hopefully be used a lot, so they had to withstand the punishment. Fortunately, today’s filament printers can also produce some very detailed results, so if we opted for one of these printers we would get the best of both worlds.
I then had to decide whether to opt for a multi-color print or paint the pieces myself. While the former is very tempting and can yield amazing results (as I mentioned in my Anycubic Kobra 3 Combo review last year), I decided against it because it felt less cost-effective. I should buy one lot of different colored rollers to make it work, which kind of defeated the point. And since I have an abundance of miniature paints for Warhammer, I felt comfortable enough to try it myself.
Yes, drastically underestimating how difficult something will be is a weakness of mine.
With all those decisions out of the way, I got to work on printing. Since my Elegoo Centauri Carbon review a while ago, this has been my go-to machine: it’s fast, reliable and gives good results no matter what I do to it. Fortunately, that was also the case here. Although it took longer than I expected to get everything done (there were lot of pieces, so take your time if you’re hoping to do something similar), I can’t complain about how it all turned out. As with many 3D printing related tricks, good preparation can help a lot; For example, printing a test piece first to work out the kinks will save a lot of effort later.
That left me with the fun part: painting and adding effects. I decided against painting the ground green, despite the fact that it would be much quicker, as it can look quite tacky unless done properly, so I opted to go full wargamer. When I’m putting together terrain, I usually apply a brown base coat, followed by dry brushing (aka removing as much paint as possible from the brush before dusting it over the model, hitting only the highest points) with something lighter. Then I use a few different herd colors to create that spotted fauna effect. This proved very effective, especially when the pieces were put together, and it brought the scene to life in just the right way. A little snow effect for the mountains and shine for the water, and we were off.
Since I don’t know when to stop, I decided to finish this crazy project with magnets. This would mean that the pieces click together nicely, without the need for clips or worrying about them falling apart during play after being bumped. Funnily enough, this was the hardest part and made me curse my life decisions.
What I was left with was a (hopefully) impressive tabletop array. I’ll just hand it over as you read this, so with any luck it will end well. But even if that’s not the case, I’m so glad I undertook this whole experience – it was an example of the downright amazing things we can now do with the right tools. While I appreciate that I’m very fortunate to have access to this gear, the troubleshooting I’ve had to do along the way will prove useful no matter what I create. It’s pushed me to try more ambitious projects in 2026… which I’ll no doubt regret in a few months.
Want to try something new in 2026? Be sure to check out the best card gamesor the best family board games.